

Considering the amount of water-related activity they endure – including baths, showers and sinks running sometimes several times a day – bathrooms can quickly become full of condensation.
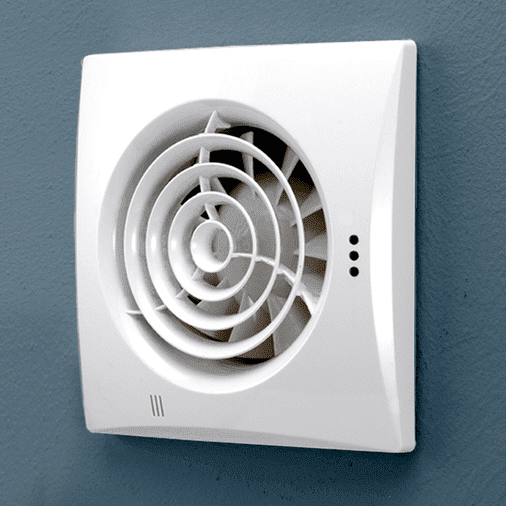
In order to prevent moisture from transforming into mould, most bathrooms require an extractor fan. This handy device draws the moisture from the bathroom and disposes of it outside of your home.
To ensure both comfort and quality in your bathroom, read on to find out how to fit an extractor fan to your bathroom wall.
Preparation
 Before beginning to install your extractor fan, there are a few things to keep in mind. If you are installing a new fan in your bathroom, you will need to drill a hole through to your outside wall. Before doing so, make sure to use an electronic device to detect for any wiring or piping that may be hidden in the wall.
When choosing where to position your fan, it is best to arrange it high on the wall, opposite the door so the air flow runs efficiently through the room.
Note: The installation process will vary, depending on the design of your fan, and so it is always necessary to consult the manufacturer instructions alongside this guide.
Materials
- Flexible ducting
- Saw (if cutting ducting to size)
- Grill covers and fittings
- Drill and correct sized drill bit
- Hammer
- Chisel
- Screwdriver
- Tape measurer
- Safety equipment: Gloves, goggles
- Pencil
Fitting the extractor fan in the wall
1. Create the hole in the wall
If you are fitting a fan in a new place, you will need to make a hole in your wall to fit the ducting from the inside of the bathroom to the outside of the house.
Once you have picked a spot for your fan and checked to make sure the wall is clear of wiring and piping, hold your fan in place. Using your pencil, trace around the circular edge of the fan and mark the centre point on the wall. Drill a hole through the wall for reference – be sure to angle the drill slightly downwards.
Drill a series of holes around the circular tracing of your fan at a distance of about 35mm apart. Once you have created this outline, use your chisel and hammer to chop out the wall within.
2. Insert the ducting into the wall
 Once you have created the hole through the wall, insert the flexible ducting. It should fit at a slightly downward angle and be flush against both the internal and external wall – trim if necessary, using your saw.
If you need to repair the internal plasterwork around the area you have drilled, or any of the external wall, now is the time to do so.
3. Fit the fan over the ducting
On the inside wall, fit the fan over the hole and use your pencil to mark the places where it is secured to the wall. Drill the holes required and insert any necessary fittings such as wall plugs. Arrange the fan over these holes and secure in place using your screwdriver and the screws provided.
The fittings for the outside wall should follow a similar procedure.
4. Make the electrical connections and secure the grill covers
A qualified electrician will need to make the appropriate connections. Depending on the design, the fan can be operated by a separate control or connected to the light switch.
Once this has been done, secure the grill covers – one over the opening on the fan inside the bathroom and one over the opening on the outside wall. If your cover has a slatted design, be sure to position them horizontally.
Always remember to adhere to the correct safety procedures and use appropriate materials. By planning carefully and following the instructions outlined, you can install an extractor fan and enjoy the atmosphere of your bathroom while feeling assured of its quality operation.


