Difficulty: Medium
Some plumbing skill may be needed for this job. But it should only take one or two hours if your machine is near to a water outlet pipe and the water supply. Always read the manufacturer’s instructions when learning how to install a washing machine or dishwasher.
Before you get started on any of our ‘how to’ guides, please take a moment to read through our DIY safety tips.
What you’ll need:
1. Preparing your new machine’s location
- If connecting pipes and a waste pipe aren’t already installed or you need to change where the machine goes, spend a little time finding the best spot.
- If your machine needs a hot water supply and is going upstairs, check there’s enough hot water pressure. If you’re unsure, call a plumber to check and do the installation.
- Any washing machine or dishwasher manual should tell you the minimum distance between the appliance and your cold water tank.
- It’s best to place your appliance against an exterior wall. That means you won’t need to have the waste pipe running along the inside wall of your home. Washing machines and dishwashers should stand on a firm, level floor.
- Most new dishwashers only need a cold water supply. Washing machines need hot and cold water supplies. They both come with hoses – normally 1.5m long with hand-tightened screw connectors on each end.
- Follow the maker’s instructions to fit water pipes to the appliance.
- Make sure you take all transport packing pieces out of your washing machine or dishwasher.
Take care!
If you need to install an electric socket for your new dishwasher or washing machine, bring in a qualified electrician rather than attempt it yourself.
2. Connecting to a power supply
- Washing machines and dishwashers need to be plugged into a standard 13 amp socket.
- If your sockets are all above the work surfaces, run a spur from a suitable socket to a switched fused connection unit above the work surface. Run a cable from this to an unswitched socket below the work surface to serve the machine.
- The socket should have an integrated light to show when the washing machine or dishwasher is switched on.
- If you’re unsure about tackling any power supply jobs, call a qualified electrician for help. And it’s worth checking with local building regulations before doing electrical work.
3. Installing a washing machine
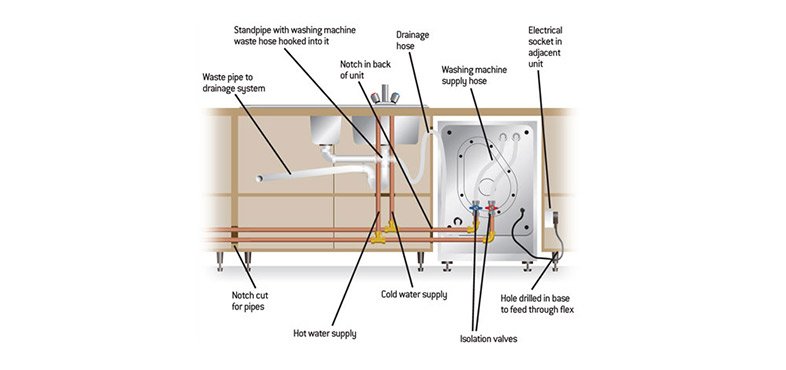
- The image below shows a typical washing machine installation. Nearby hot and cold water pipes have been extended with T-fittings to reach the supply hoses.
- Fit isolation valves so your washing machine can be isolated without having to cut off the hot and cold water supplies.
- Hook the waste hose into the trap at the top of the standpipe.
4. Installing a dishwasher
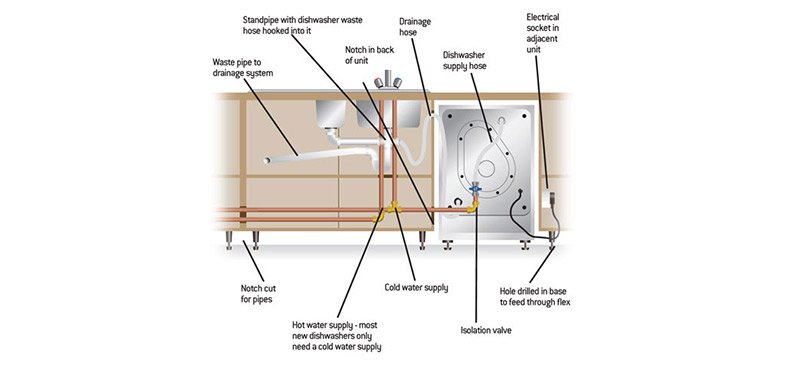
- The image below shows a typical installation of a dishwasher (which only takes a cold water supply).
- Fit isolation valves so your dishwasher can be isolated without having to cut off the hot and cold water supplies.
- Hook the waste hose into the trap at the top of the standpipe under the sink.
Top tip: Keep your washing machine in top condition by running it on a ‘service wash’ once a month. Turn it to the highest heat setting without putting in laundry. This clears grease from the pipes and drum.
5. Connecting to an existing water supply
- If you’re replacing an old machine the hot and cold water supply pipes will already be in place.
- Screw the end of the washing machine’s cold water pipe to the blue-coloured valve on the end of your cold water supply pipe.
- This valve allows you to turn off the water supply to your washing machine or dishwasher if there’s a problem with it.
- If your machine also uses a hot water supply, connect this hose to the red valve in the same way.
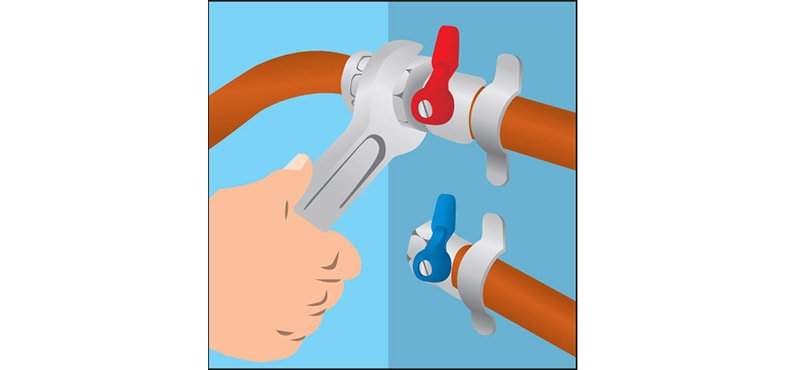
- If one of the hoses that came with the machine doesn’t reach an existing valve, you can buy an extra length of flexible hose. Connect the two pieces together with an inlet hose connector.
6. Fitting a new water supply
- If hot and cold connecting valves aren’t already fitted, self-cutting valves are the easiest way to plumb in your washing machine or dishwasher.
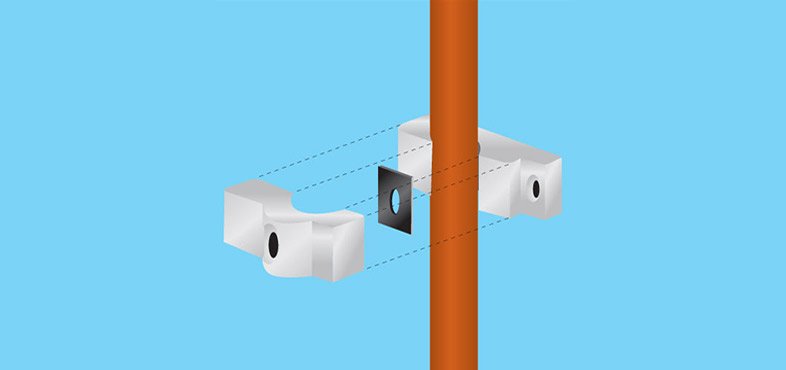
- These valves come as a kit and you can attach them to hot and cold 15mm copper water pipes without having to turn off the water supply. Here’s how to do it:
- First find a good spot on a section of your cold water supply pipe.
- Then fit the back plate of the valve directly behind the pipe. Place the top piece over this and screw the parts together around the pipe.
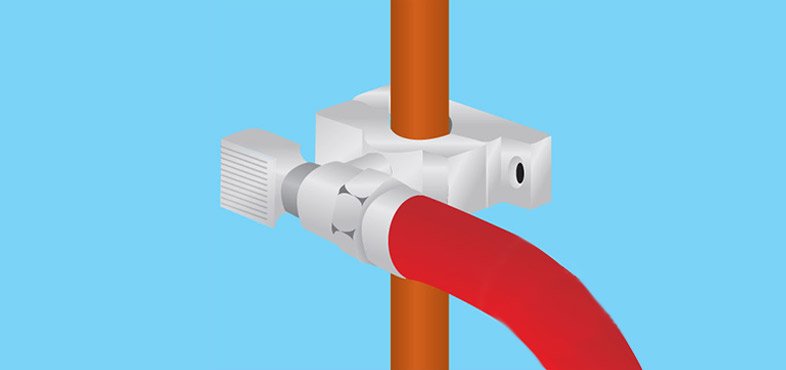
- Turn the valve to ‘off’ and screw it into the pipework. This will make a small hole in the copper pipe. Use two spanners to tighten the nuts.
- You then screw the cold water flexible plastic hose from your machine to the end of the valve.
- Repeat the steps above for the hot water supply if your machine needs cold and hot water.
7. Using your sink to drain
- The machine’s flexible waste hose has to discharge into a waste pipe (standpipe) or trap above the level of the top of the drum.
- One option is to put your machine next to a sink and change the sink trap to a washing machine/dishwasher trap. This has an inlet for the waste hose.
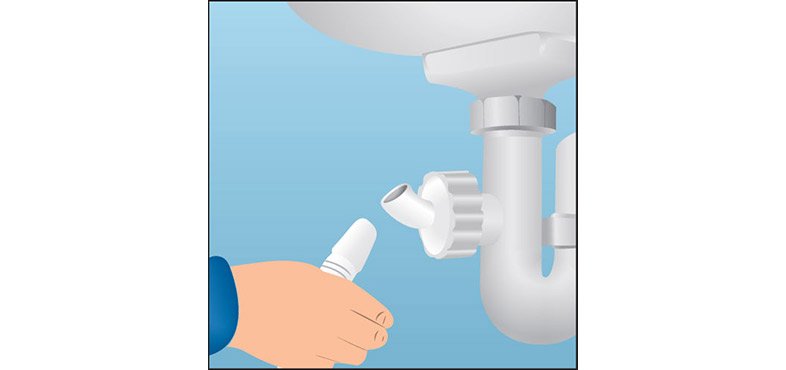
- Install a non-return valve to prevent back-siphonage of waste water, or fix the hose so it runs higher than the level of the sink overflow. This ensures the waste water doesn’t run back into the machine.
8. Using a waste outlet to drain
- If your machine isn’t close enough to connect to a sink waste trap, or there’s a vertical waste pipe already on the wall behind the machine, connect your waste pipe to this outlet instead.
- Simply push the flexible pipe supplied with the machine into the top of the 40mm diameter waste pipe. This connects to the sewer system for the house.
- You can buy a waste outlet pipe as a DIY kit. If you use one, make sure the end is at least 600mm above floor level.
9. Checking the connections
- Turn on the cold supply valve (and hot if fitted) and check the pipes for leaks.
- If everything’s OK, plug in the machine and start a short wash cycle to check that it takes in water and the waste water drains away.
- When you’re happy that all is well, push the machine against the wall.
And that’s how to install a dishwasher or washing machine. Check out our other plumbing and heating advice here.
