

How do I install corner cabinets?
1. Set the pencil line
2. Mark the corner post
3. Attach the corner post
4. Attach brackets to the smaller cabinet
5. Move the small cabinet into position
6. Move the large cabinet into position
7. How to level cabinets
8. Secure the cabinets to the wall
9. Secure the corner post in place
What you’ll need:
- A 1200mm, 800mm and 300mm spirit level
- A combi hammer drill
- Assorted drill bits
- Wall plugs
- A tape measure
- A corner post
- Quick grip clamp
- Phillips screwdriver
- Assorted screws
- A carpenter’s pencil
- Brackets, your 300mm and 800mm base cabinets and all their fixings, plywood or MDF and 2 workhorses
1. Set the pencil line
Before installing corner cabinets you’ll need to mark a pencil line on the wall. This will act as a guide to make sure your cabinets all sit at the same level throughout the kitchen. The overall height of kitchen units and a worktop is normally 910mm – 870mm for the cabinets and 40mm for the worktop. This can differ depending on personal preference and the height difference of the floor throughout the room.
Starting at the highest point of the floor, dry-lay your first cabinet and use a spirit level to make sure it’s level on each axis. If the cabinet is not level then adjust the legs, checking with a spirit level until the cabinet sits level. Once this is done, dry-lay the other cabinets until you reach an appliance gap. When you get to the appliance gap the height of your cabinets should still sit at 870mm.
At this stage you will need to allow for your flooring. Measure and add the thickness of one of your floorboards to your total measurement. The reason for doing this is so that when you install your appliance on top of the flooring it will be able to sit underneath the worktop. Now you have the height for your cabinets, remove all units except for the one at the highest point of the room. Then, adjust the legs using a spirit level to check that the cabinet is level on each axis as you work. Finally, make a mark at the point where the back of the side panels butt up against the wall. Once you’ve done this, remove the dry-laid corner cabinets and draw a line along the wall using a spirit level. It’s important to draw the line up until the point that the kitchen finishes. Always refer to your kitchen plans for this information. Now you can move on to installing corner cabinets.
2. Mark the corner post
Firstly, attach the corner post onto the large cabinet. To do this you’ll need to know what size door you’ll be using for the large unit. Check your kitchen plans for these measurements. Once you know this, place your tape measure on top of the cabinet, starting on the side furthest from the adjoining wall and measure the width of your door along the top of the cabinet. Make a mark at this point with a pencil.
Repeat these steps for the bottom of the cabinet and place another mark on the side of the bottom panel. Now, take your corner post and line it up with the inner edge of the marks you just made. To make this easier for yourself place a quick grip clamp on the top of the corner post to hold it in place as you work. Then, steadying the bottom of the corner post, place a pencil between the vertical rail and the corner post and mark a line up from bottom to top where the post joins the vertical rail.
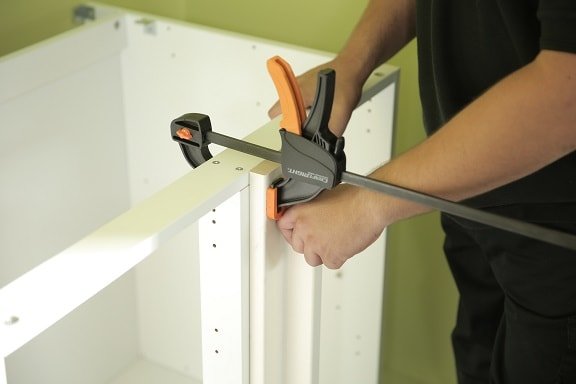
3. Attach the corner post
Remove the clamp from the corner post and place the post back on the workbench. Take a tape measure and pencil and mark 30mm in from the top and bottom of your corner post for bracket placement. To make sure you don’t use too large a screw, overhang the edge of the bracket with the edge of the corner post and slide a screw through the bracket to check the depth it will plunge into the wood. If the screw doesn’t go all the way through the wood then it’s right for the job.
Next, line the side edge of the bracket up with the 30mm mark you made earlier and make sure the bottom of the bracket is flush with the line you made between the vertical rail and the corner post join. When this is in position secure the bracket to the post and repeat these steps for the bottom bracket. Take the corner post and slot it back up against the vertical rail of the large cabinet. The brackets should stop the post from moving beyond the vertical rail. Now, secure the post back into position with a clamp, hold it steady at the bottom with one hand and screw the brackets into the vertical rail.
4. Attach brackets to the smaller cabinet
The next step is to attach some brackets to the smaller unit. Measure 30mm in from the top and bottom on the left-hand side panel. Then, make a mark at these points with a pencil for bracket placement. Check the screw size using the same method as earlier, overlapping the top of the bracket with the top of the cabinet and threading a screw through to check the depth that it plunges into the wood. When you have the correct size screw, attach the brackets as you did earlier with the corner post, making sure the edge of the bracket is flush with the front edge of the cabinet.

5. Move the small cabinet into position
The next step, is to push the cabinet against the wall – any wall is fine – and measure from the wall to the outer edge of the corner post. Using this measurement as a guide, measure back from the wall that the large unit will sit on and make a mark on the adjoining wall. Use this mark as a rough guide for where to place your smaller cabinet. Lift and move your cabinet into position, lining it up with the inner side of the mark you just made.
6. Move the large cabinet into position
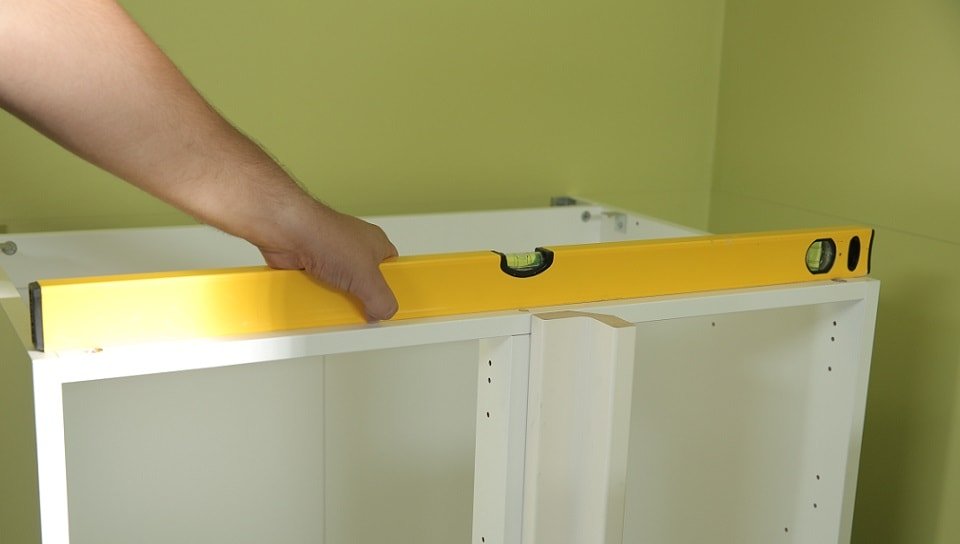
With this in position you can move the large cabinet into place. Keeping the cabinet as close to the left-hand wall as possible, lift and move this back towards the adjoining wall until the corner post hits the brackets installed on the smaller cabinet. With the larger unit in position, remove the smaller unit to give yourself space to work with. Starting with the larger cabinet make sure that it’s level on all sides.
First, adjust the legs until the top of both side panels sit flush with the pencil line you drew along the wall earlier. Once flush, place the spirit level along one of the side panels and adjust the front legs accordingly, repeating this for both sides. Once these are level, place the spirit level along the back and front of the cabinet and adjust the legs, checking with a spirit level as you work. Finally, give all sides one final check with your spirit level. It’s very important to make sure this is exactly level, otherwise your doors won’t sit correctly.
7. How to level cabinets
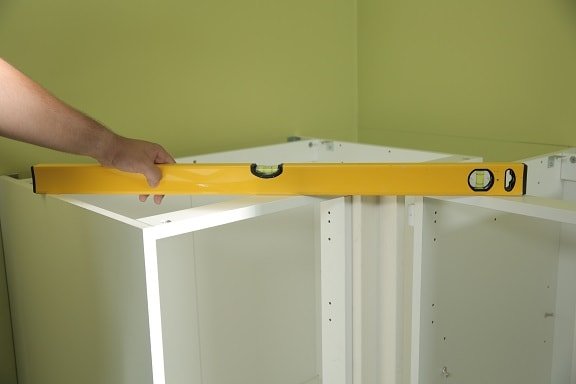
After this is level, lift and move the smaller cabinet back into position. Lay a 1200mm spirit level across the front of both the large and smaller cabinet. Then, adjust the left-hand side of the smaller cabinet’s legs first, using the level from your large cabinet as a guide. Once this is level, place the spirit level across the back of both cabinets and check that this is also level. If it isn’t, adjust the legs accordingly. Use a 300mm spirit level across the front and back of the smaller cabinet, adjusting the right-hand legs until they are level on all sides. Finally, check that the two cabinets are still level with each other by placing a 1200mm spirit level across them again. If they aren’t, readjust the legs until they’re completely level. If there are any gaps left between the cabinets, gently lift these together until all gaps are closed and the brackets on the side of the smaller cabinet sit flush with the back of the corner post.
8. Secure the cabinets to the wall
You can now secure the cabinets to the wall. Firstly, mark the wall through the brackets on the back of both cabinets. Unscrew the brackets from the back of the cabinets using a screwdriver, remove these and set them to one side. Then, drill into the wall at the points you just marked. The size of the screws you are using to secure the cabinet to the wall will determine both the wall plug and drill bit size you use. Select the right drill bit for your screw and switch the drill to its hammer function if you’re going into brick. Once you’ve drilled the holes press a wall plug into each hole, making sure each one is flush with the wall. Then, reattach your brackets onto the back of the cabinet and secure the cabinets to the wall using your selected screw.
9. Secure the corner post in place
Finally, screw the corner post to the smaller cabinet using a Phillips screwdriver and the same screws that you checked were right for the post earlier.
Start your kitchen project today by booking a free kitchen design consultation at your local store.


