Wallpaper is a great, versatile product that can be used throughout the home to add visual interest and sophistication to any room. Some homeowners prefer to decorate with paint for fear of not being able to hang wallpaper. But once you know how best to hang wallpaper, it’s a simple task that even DIY beginners can tackle.
This step-by-step guide is designed to show you how to hang wallpaper, so you can paper your walls to perfection.
Let’s get started with what you’ll need…
Materials:
Tools:
- Tape measure
- Wallpaper pasting brush
- Plumb line
- Trimming knife
- Wallpaper scissors
- Wallpaper hanging brush or wallpaper smoothing tool
Before you start
Read our DIY Safety Tips, as this project requires the use of some tools and chemicals. Keep your space well ventilated, lay a protective sheet over your flooring and cover all switches and sockets with masking tape. Keep adhesives away from children, always use a suitable ladder and make sure you follow the manufacturer’s instructions when handling chemical products.
Measure the room
First, work out how much wallpaper you’ll need to hang to cover the whole room.
Measure the total perimeter of the room in metres (including doors and windows), then divide that by the width of the wallpaper.
Multiply the height of the room by the number of widths needed to get the total length of wallpaper required – and divide this by the length of a roll. This will give you the number of rolls you need.
Top tip: Buying an extra roll or two is always a good idea. Just keep hold of your receipt, so you can easily return any unused rolls.
Cut the wallpaper
Before you begin to hang wallpaper, it helps to cut the rolls down into manageable sections.
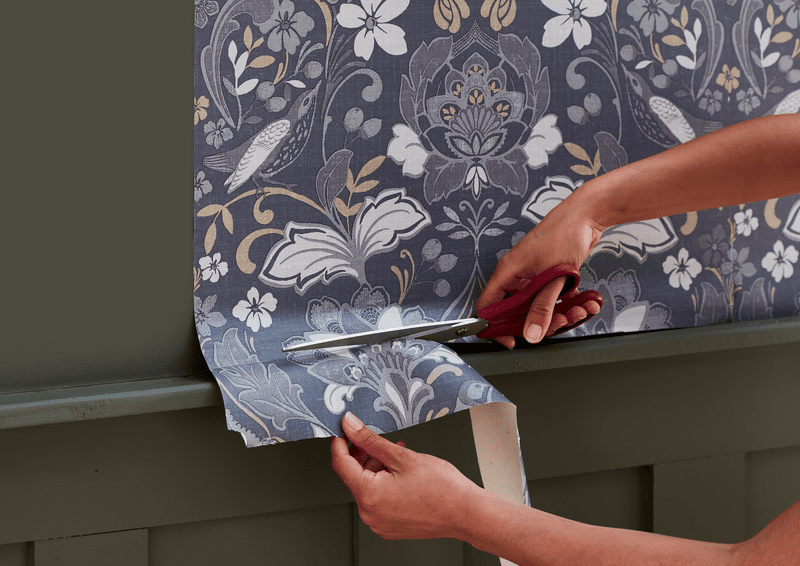
To do this, measure the height of your wall and add 10cm to this measurement to allow for trimming. Use wallpaper scissors to cut your first strip and then use the strip as a guide to cut the second, followed by the rest.
Top tip: If your wallpaper has a pattern on it, you can find out how to hang it properly further down the page.
Mix the wallpaper paste
Depending on which wallpaper paste you have, how you prepare it may be a little different. So, follow the manufacturer’s instructions for this step.
How to paste different types of wallpaper
Paste-the-wall wallpaper
Some wallpaper allows you to paste the wall rather than having to brush the strips of wallpaper with adhesive on top of a pasting table.
To hang paste-the-wall wallpaper, simply cover a section of the wall with your paste adhesive using a pasting brush and unroll the wallpaper from the top corner of the wall to the bottom. Carefully smooth out the wallpaper as you go down the wall with a wallpaper brush or smoothing tool. Trim any excess from the bottom.
Paste-the-paper wallpaper
To hang paste-the-paper wallpaper, place the wallpaper strips face down on a pasting table. Follow the manufacturer’s guidelines to make up the paste – and using upwards and outwards movements with a pasting brush, apply the paste to the back of the wallpaper.
If any paste gets on the patterned surface, sponge it off straight away. Fold the ends of the strip in towards the middle of the length, and then you’re ready to hang wallpaper.
Top tip: If needed, allow the pasted strip to ‘soak’ – meaning leave the wallpaper to expand to its maximum width once the adhesive has been applied. If you’re wondering how long do you soak wallpaper for, the soak time is normally indicated on the label, e.g. five minutes.
Top tips before you hang wallpaper
Make sure your walls are dry and smooth. If you’re wallpapering on plaster, sand the walls down and apply a universal primer. This will help the surface to get a good grip on the wallpaper.
If you are planning to wallpaper over paint, ensure the wall is in good condition and then wash with multi-surface soap, let it dry and add an acrylic primer before hanging wallpaper.
When to use lining paper
If your wall has imperfections, or you’re hanging embossed wallpaper, consider applying lining wallpaper before your decorative choice. This will ensure the surface is as smooth as possible.
Lining paper is usually applied horizontally to avoid the joins between the strips lining up with those of your decorative wallpaper. Wait 12 hours for the lining paper to dry before applying your decorative paper.
How to hang patterned wallpaper
If you want to learn how to hang wallpaper that has a pattern on it, start at the window and work out the way in both directions – towards the darkest corner of the room.
Using a plumb line, draw a vertical line with a pencil down the first wall you are going to paper. This will ensure your patterns stays straight.
Unfold the top half of the pasted length and press it gently against the top of the wall (allowing enough paper – about 50mm – to be trimmed off at the ceiling). Then, use a papering brush to smooth the length into place and remove any air bubbles.
To trim any excess paper, mark a line down the corner of the paper, ease the paper away from the wall and trim it with scissors. Brush the paper back into place.
For the second strip of wallpaper, place it next to your first and smooth it into place as before. Make sure you create a seamless butt joint and match the pattern as you position each subsequent strip.
Top tip: If your design has a large pattern, start at the centre of a feature such as a chimney breast or main wall. Before cutting wallpaper with a large pattern on it, make sure you will be left with a full motif at the top of the wall. Keep any extra pieces you cut off for above doors and windows.

