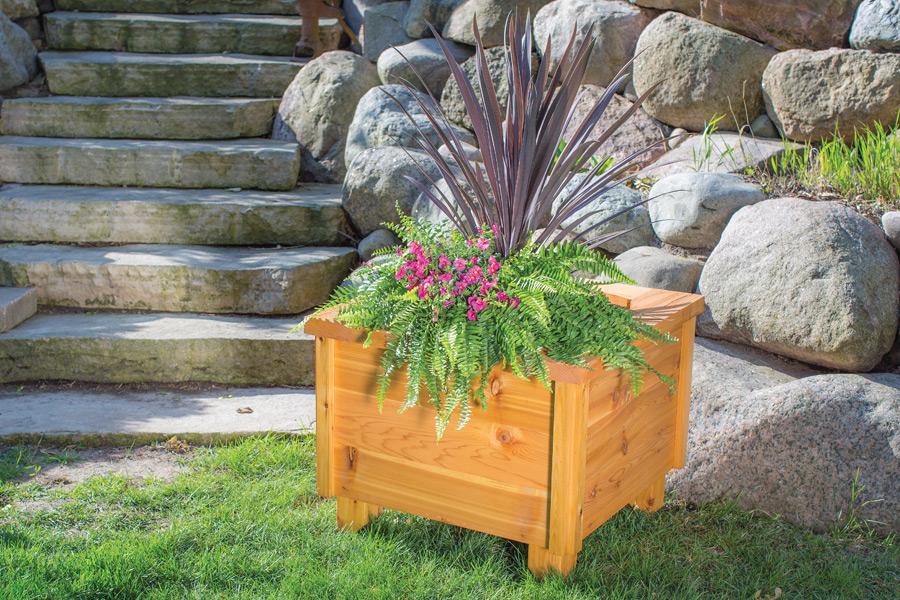
How to Build an Outdoor Planter:
1. Create the side slats
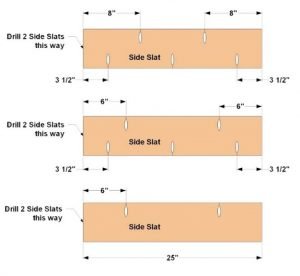
Cut six side slats to length from 1×6 boards.. Then, with your pocket-hole jig, set up for 3/4″ material, drill pocket holes in the side slats as shown.
2. Assemble Side Panels
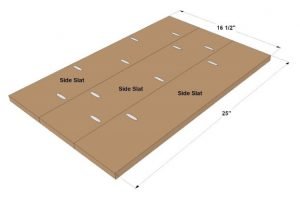
Create two side panels by joining side slats together as shown using 1 1/4″ exterior-rated pocket-hole screws.
3. Create the Legs
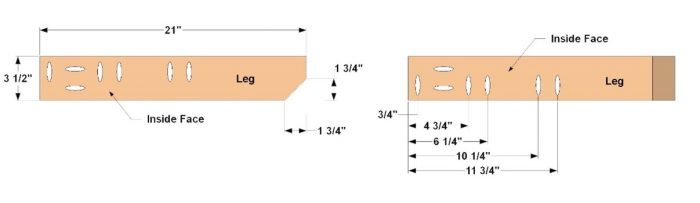
Cut four Legs to length from a 4×4 board, as shown in the cutting diagram. Next, cut the angle on the end of each leg. With that done, you can drill pocket holes, as shown in the two inside faces of each leg.
Note that the pocket holes at the upper end are drilled with your pocket-hole jig set up for 1 1/2″ material. The holes along the edges are drilled with your jig set for 3/4″ material.
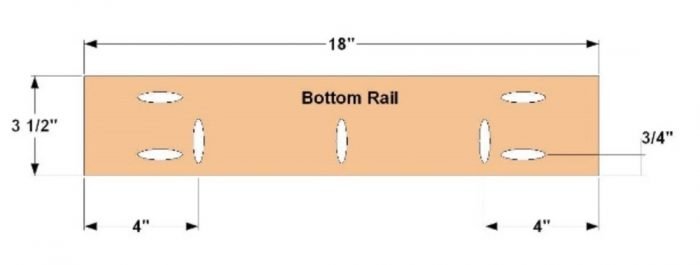
 4. Make Bottom Rails
Cut four bottom rails to length from a 2×4 board, as shown in the cutting diagram. Then drill pocket holes as shown. Like with the legs, the pocket holes in the bottom rails require two jig setups: the end holes are drilled with the jig set for 1 1/2″ material. The holes along the edge are drilled with the jig set for 3/4″ material.
5. Make Two Side Assemblies
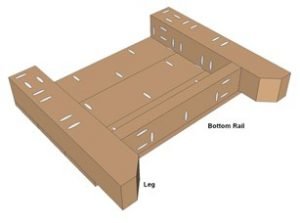
Now you can join the Legs to the bottom rails using 2 1/2″ exterior-rated pocket-hole screws. Then attach the side-panel assembly using 1 1/4″ exterior-rated pocket hole screws. Note that the side panels get screwed to the legs and to the bottom rails. Create two of these side assemblies.
6. Join the Side Assemblies
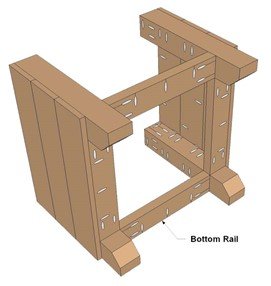
Join these two assemblies together by attaching the other two bottom rails using glue and 2 1/2″ exterior-rated pocket-hole screws. Bar clamps can hold the parts in position as you drive in the screws.
7. Create the End Slats
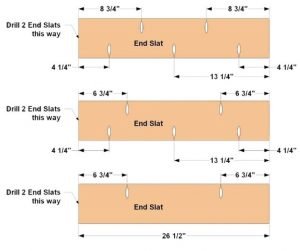
Cut six end slats to length from 6×1 boards, as shown in the cutting diagram. Then, with your pocket-hole jig set up for 3/4″ material, drill pocket holes in the end slats as shown.
8. Assemble End Panels

Create two end panels by joining side slats together as shown using 1 1/4″ exterior-rated pocket-hole screws.
9. Attach the End Panels
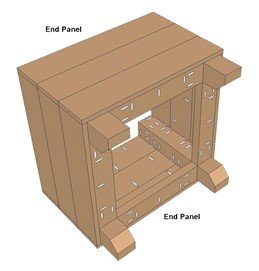
Attach them to the leg assemblies using glue and 1 1/4″ exterior-rated pocket-hole screws. Make sure that the assemblies are square, and that the ends of the slats align with the faces of the side slats, which were attached earlier. Note that the slats get screwed to the legs and to the bottom rails.
10. Cut the Curved Top Trim
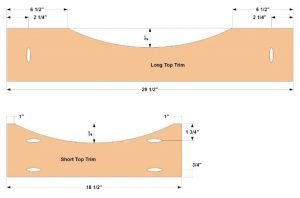
Cut two pieces of long top trim and two pieces of short top trim to length from 6×2 boards, as shown in the cutting diagram. Then lay out and cut the arcs in each piece using a jig saw. After that, drill pocket holes with the jig set up for 1 1/2″ material.
11. Join the Top Trim
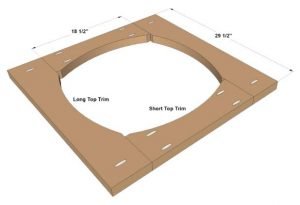
Join the long and short top trim pieces together using 2 1/2″ exterior-rated pocket-hole screws.
12. Attach the Top
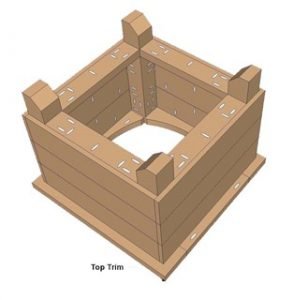
Attach the top trim to the assembled base using 1 1/4″ exterior-rated pocket-hole screws. Make sure that the trim overhangs equally on all sides before driving in the screws.
13. Add Edging
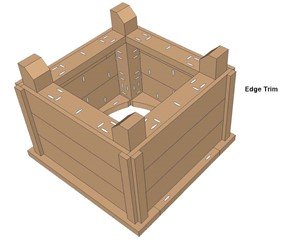
Cut eight pieces of edge trim to length from 2×1 boards, as shown in the cutting diagram. Then, attach the edge trim to the corners of the planter using 1 1/4″ exterior brad nails.
14. Make Bottom Slats
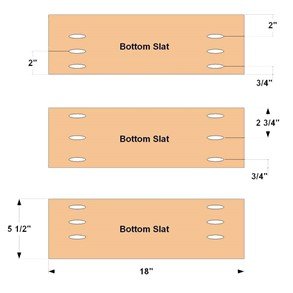
Cut three bottom slats to length from a 6×2 board, as shown in the cutting diagram. With your pocket-hole jig set up for 1 1/2″-thick material, drill pocket holes in the bottom slats, as shown.
15. Attach the Bottom Slats and Finish
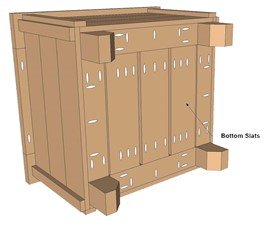
Attach the bottom slats to the bottom rails using 2 1/2″ exterior-rated pocket-hole screws. Leave consistent gaps to allow water to drain out of the planter. With the bottom slats in, you can do any necessary sanding, and then protect your planter with a couple of coats of exterior stain or finish.