
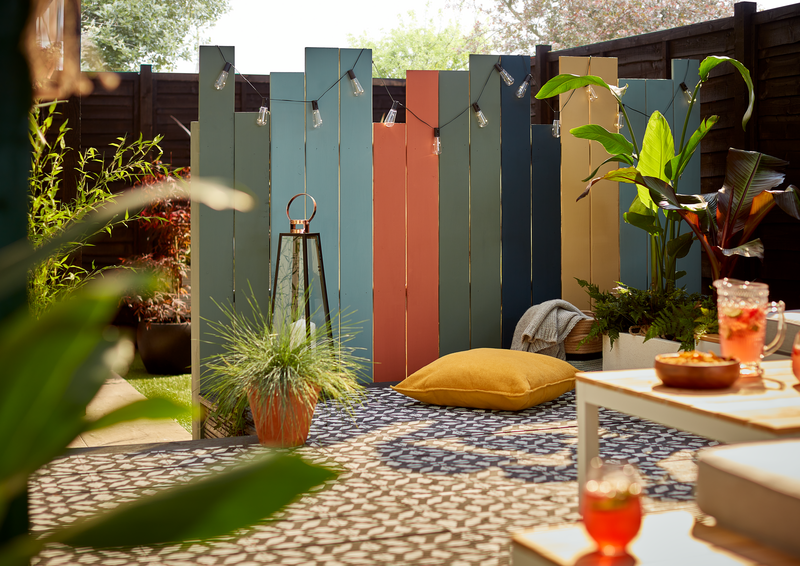

A garden divider fence is a great way to create privacy or establish zones within your outdoor space. The joy in building your own DIY garden screen is that you can craft it to be any size you like and decorate it as you please.
So, whether you’re looking to design an enclosure around a seating area, create a spot for sunbathing concealed from the neighbours, or add structure to different areas of your garden, these step-by-step instructions will show you how to build a garden screen to suit your needs.
Let’s get started with what you’ll need…
Materials
- Sawn wood timber for main divider (the number will depend how big you want your garden divider fence to be)
- 4 x timber stripwood planks for frame
- Screws
- Wood paint
- Safety goggles
- Cement
- Gravel
- Chalk line
- Marking paint
Tools
- Measuring tape
- Pencil
- Drill and Drill bits
- Paint brushes or rollers
- Post digger
- Sander
- Clamps
Before you start
Read our DIY Safety Tips and ensure you know how to use your power tools correctly and safely. Wear safety goggles when necessary and take your time.
Gather your materials

You will need a total of four timber stripwood planks to create the back frame – two that are the same length vertically and two that are equal, just a few inches more than the desired horizontal length you want your DIY garden screen to be.
Follow this with however many pieces of timber it takes to create the length of your garden fence divider.
Once you have everything, sand them down to a smooth finish.
Top tip: Add up the total length of your pieces of divider fence timber horizontally. Then, add on a few inches to get the correct length of your garden screen’s back frame.
Create the back frame
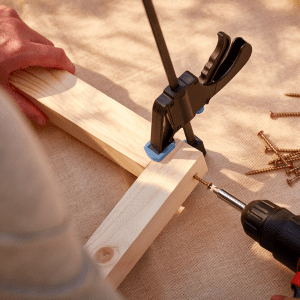
When building the back frame of your garden divider fence, keep a rectangular shape in mind.
The two stripwood planks that will become the vertical outside posts need to be shorter than the vertical length of your timber planks. The top horizontal plank of the back ‘rectangle’ frame should reach about ¾ of the way up your timber sheets.
Lay the frame of your garden fence divider onto flat ground. Place the top horizontal plank at the very top of the two vertical timber planks, and the bottom horizontal plank about 1/3 of the way up the two vertical timber planks. Then, secure with clamps and drill together.
Top tip: When deciding the length of your vertical outside posts, remember that part of them will be embedded into the ground.
Make the post holes
To fix your DIY garden screen into the ground, measure the horizontal length of your divider and then mark out exactly where the holes need to be with marking paint.
Before going ahead, check you will not be disturbing any utilities. When it comes to the diameter of the holes, calculate three times the size of the post going into it.
Then, it’s time to use your post digger to help you burrow deep enough for the fence posts to go into the ground and secure the base.
Add a couple of inches of crushed stone or gravel to the bottom of the holes to help with drainage around the fence posts and to level the surface.
Insert your posts into the holes (with some help) and use a spirit level to check your frame is level. Fill the holes with concrete to give your garden fence divider strength and durability – but stop about 4-6 inches from the top of the hole. Then, back fill the top of the hole with the dirt you pulled up to create the hole.
Top tip: If you are securing your DIY garden screen onto grass, sprinkle lawn seed around your post hole to stimulate grass growth.
Paint your garden divider
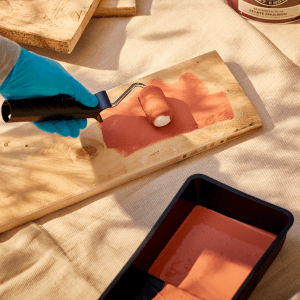
It’s much easier to paint your fence planks before you secure them to the frame.
You want your garden divider fence to stand out against your more traditional perimeters. After all, it is hopefully going to create a more unique, private section to your garden.
Use a handful of different exterior wood paint colours, and a primer for added protection against the elements.
Top tip: If you want to know which fence paint colours will make your garden feel bigger, check out this handy fence paint colours guide.
Secure your wooden planks
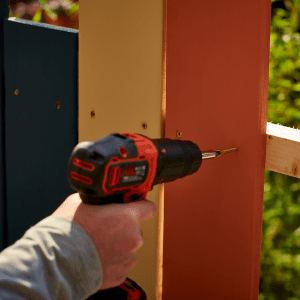
Once the planks for your garden divider fence have fully dried, it’s time to secure them to your frame with a drill and screws.
Add a bit of character to the structure by attaching each plank at different heights.
Time to decorate
With your garden divider fence firmly secured, you can get decorating!
You may want to add a row of string lights to the top of your new DIY garden screen and create a cosy, cornered off zone with throws, cushions and outdoor lanterns.
Or, if you’ve built your garden screen to create a dining zone, treat yourself to a new table and chairs set or a garden sofa for a more relaxed atmosphere.
And that’s your garden divider fence complete! Now you’ve learnt how to build a garden screen, check out our Outdoor Living Space Ideas to see how you can make the most of your garden space.


